Making drainage holes
By wohlibuli
9 comments
I have a lot of old crockery, teapots with broken lids and things I would like to use for plants, but until now I had to just sit a smaller pot inside the piece. I thought there must be a way to drill drainage holes. After doing some research online, I had all kinds of contradictory info. But I know you can cut tile so there must be a way. I got out my handy Dremel Tool manual and read how to cut tile with it and then tried it on my old teapot. It works and this is how you do it.

This is my old teapot with the broken lid, but any glazed crockery will work. You will also need a rotary power tool, mine is a Dremel Brand

You need protection for eyes and lungs

And a special bit for cutting tile

Starting at a 45 degree angle you score the glazing on your pot, once you have a big enough area of glaze removed, apply slight pressure and make a sort of valley for the bit to rest in.

Once you have a deep enough valley slowly bring your drill to 90 degrees while continuing to apply slight pressure.

Continue to drill while alternating slight and hard pressure until you have drilled through, then move the bit in a circular manner to enlarge the hole to the size you want. The pot will move somewhat when you do this so you can either us a soft vise if you have one or just brace it with yours or a helpers arms.

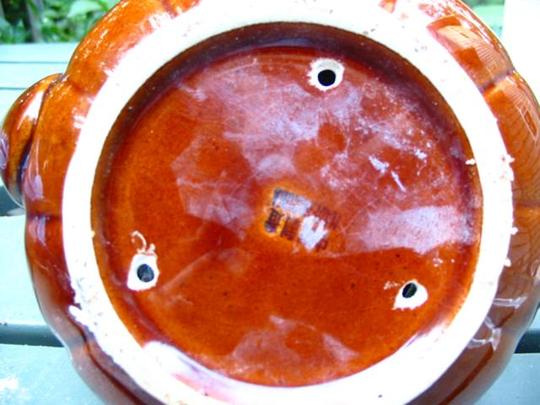
And Voila! nice new drainage holes!
I hope this is helpful to some of you.
I am thinking of all kinds of things around here to use for plants now!
 19 Aug, 2008
 0 likes
Previous post: Hanafuda
Next post: New greentent!
Comments
This is a very useful blog, Wohlibuli, and with extremely clear photos, explaining each stage of the process.
I'm guessing you practised drilling on old bits of tile and crockery first before you tackled teapots ?
Maybe we should first check that our pottery items aren't especially valuable.. lol....
I expect you saw on international news programmes the recent report of an antique pot/vase in which the owner had drilled a hole through the base to make it into an electric lamp. This meant the vase which would have been valued at thousands of pounds was virtually worthless lol
20 Aug, 2008
Well done - I bet you're pleased with that achievement! Looking forward to seeing what you plant.
20 Aug, 2008
Terratoonie,
Well, yes you should know what you are drilling on, I would always make sure something is not a valuable item. But I have and probably a lot of others do too, lots of old cheap crockery. I can't say if this will work on fine china and I would be careful if trying it. I actually did not do a test before trying it on my teapot, but I have cut both floor and wall tile, when working at the DIY store and so I knew it could be done in theory. This would allow us to use some pots that we like that aren't originally meant for plantings. There is a lot of cheap quality stuff out there! : )
20 Aug, 2008
Good idea Wohibuli, and helpful photo's. Don't forget to show us what you plant in it!
20 Aug, 2008
Your teapot looks very successful indeed.
I think you'll end up with the most unusual flowerpots in Georgia.... or even the USA.
Can't wait to see photos of them all planted up.
20 Aug, 2008
I picked up a bit today for my Dremel so I'm all set to go. Thanks again for posting :)
21 Aug, 2008
Thank you for this information Wholibuli. I've bought clay pots in the past with no drainage holes so now I know how to do it. They will no longer be left unused in the shed. All the best, H.
21 Aug, 2008
Featured on
Recent posts by wohlibuli
- I'm back...
4 Sep, 2009
- Better late than never!
21 Jun, 2009
- We can only wait....
19 Jun, 2009
- Rain, rain, rain rain rain!
25 May, 2009
- Garden in a pool!
23 Apr, 2009
- Pollen season
5 Apr, 2009


Helpfull indeed Wohlibuli... This is GREAT. I have a lot of pieces like this myself. I was always afraid of cracking the china or ceramic pieces. I've always wanted to plant directly in these pieces. Thanks for posting :)
20 Aug, 2008