Amaryllis - Some things you might like to know
By balcony
11 comments
Amaryllis – Some things you might like to know
Some time ago I promised to write a blog on looking after your Amaryllis once they have flowered. I’ve had several requests to which I have responded individually but I also said I would create a blog with all of my advice in one place, so here goes …
So your Amaryllis has finished flowering & now you are wondering what to do with it to get it to flower another year?
Spent flowers:
Once the flowers have died you want to remove them (unless you are planning on growing them from your own saved seeds, which I won’t go into here).
First of all a warning!
The red ones especially can stain your clothing & hands & anything they come into contact with if the dead flowers are not paper dry when you go to remove them. Fortunately the stains are not permanent & can be removed in the normal course of washing. Nevertheless I think it is something you should be aware of. The pollen likewise will stain everything it comes into contact with. Again it is removed easily without leaving permanent stains. You can cut off the stem right the way down to the base if you wish, I, personally, like to leave them till they dry out completely but that is not indispensable.
Once more a warning: The stems are hollow & there can be sap/water in the interior, something to be aware of when you are cutting them off. The stems do not cause any staining that I’ve ever noticed.
Leaves:
Leave the leaves to continue to grow: – as you should with any bulb you want to conserve after it has finished flowering! Remember it is the growing leaves that build up the bulb’s food resources for the following year. No leaves = no flowers!
The leaves are very long & strap-shaped. They will flop all over the place! Bear that in mind when you look for a place to keep them while they are growing. The spent bulb will need a place where it gets good light – from full sun to light shade, though the more light it receives the better will be next year’s flowers.
Watering:
Always a difficult subject – for any growing plant! Warning: Amaryllis bulbs have thick, fleshy roots. As with all plants like that, they will rot if left to stand in water for days at a time. Again these sort of plants do much better dry than water logged – but they are neither succulents nor Cacti – so don’t go to the extreme of never watering them for fear of causing them to rot! Just use some common sense & all will be well.
Feeding:
I like to feed my bulbs with a liquid general fertilizer once a week or ten days. Just follow the instructions on the bottle & all will be well. I like to use a general fertilizer for the first couple of months of spring/summer then I change to a high potash one – Rose or Tomato fertilizer is ideal. This will encourage the formation of flowers for the following year. A general fertilizer will contain more nitrogen – ideal for leaf growth, which we want to encourage at first as it is these that feed the bulb, but we want to discourage leafy plants as these won’t flower as well & the leaves will get so large they will become a nuisance!
Rest period or Hibernation:
In the same way Hyacinths & Daffodils & Tulips need to die back & have a few months rest so it is with Amaryllis. Only in the case of Amaryllis they can be evergreen if the temps are right. I like to stop all feeding by the end of August & then during September let them dry out. Do not give them a drop of water from the end of September (or your summer if you live in the Southern hemisphere. Perhaps March/April?) Even without water the foliage can persist with little noticeable change for at least 3 months – other than the leaves looking a little limp & a touch greyish. When & if the leaves begin to turn yellow you can remove them. The leaves can persist all winter if you give them a little water no more than once a month. It will do them no harm, just be very careful not to add more than a little. They can rest with green leaves or no leaves at all. As I have no place in our flat other than the windowsills that is where they spend 6 months of the year. They also need cooler temps so resting them in a window that is frostproof is OK. I’ve done that for the past 14 years & you see the flowers I get!
Flowering the following year:
Getting them to flower again for their 2nd year is no more difficult than it was when you bought & planted your first bulb. All you need to do is to put the bulb in a 6" pot half filled with new compost/soil/dirt; put the bulb in the centre of the pot & add more new compost/soil/dirt, firming it a little with your fingers as you add handfuls. You want to end up with nearly half the bulb sticking out of the compost/soil/dirt. The bulb must not be buried or it will most likely rot! When you have finished potting it up give it a drenching & leave to drain. Put it in a warm, light place but don’t water any more till the flower stem (Scape) is well out of the bulb. The plant at this stage has next to no roots so can’t take up much water & you may cause it to rot. The roots will grow quickly enough over the following weeks as soon as the flowers start to go over/die.


If your plant remained in its original pot during winter you can replace some of the compost/soil/dirt & then replace it with new compost/soil/dirt.
Bulb & offshoots before repotting:

Alternatively you could empty the bulb out of its pot, cut away the dead roots (easily identified because they will be dark brown & withered) being careful not to damage any new roots that might be forming (thick, white roots).
Bulb cleaned up before repotting:


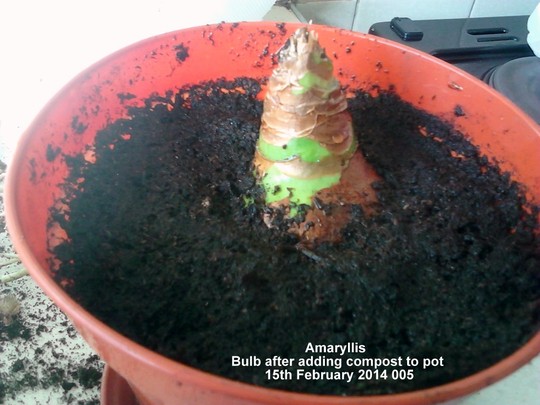
Amaryllis before adding compost to pot:

Amaryllis bulb finished repotting:

Amaryllis bulb after adding compost to pot:
If you have more than a couple (as is my case!) you might like to follow the procedures outlined above but leaving a couple of weeks between the pottings so as to get a staggered flowering instead of them all flowering at the same time. That is what I did this year with my bulbs. Three batches were planted with two weeks between them & the last batch about 3 weeks after the 3rd batch as I did them all in 4 sessions.
Before the first batch had finished the 2nd batch had begun & ditto for the third batch. My last batch consisted more of bulbs I thought were too small to flower this year but that needed to be grown on during this coming year to fatten up to flower in successive years.
Amaryllis blogs
Now I’m going to add links to some of my previous blogs on my Amaryllis so you can see not just the flowers and read what I had to say in the blogs but especially in the comments below each blog as I advised people on questions they had.
I can only speak of/from my personal experience, perhaps it may differ in some points from what you may have read from others. But for me everything I describe in my blogs is what has worked for me & I’ve been growing these bulbs with a lot of success since a sister of mine gave me my very first bulb for Christmas – waaaayyyy back in 1971!
The first link below was my first ever blog on Amaryllis. All the flowers you see in my blogs have come from the seeds I describe having grown there:
http://www.growsonyou.com/balcony/blog/3720-amaryllis-from-seed
The next link shows the above seedlings now in the very first year of flowering:
http://www.growsonyou.com/balcony/blog/9726-amaryllis-seedlings
Here’s a light hearted blog parodying the Olympic Games of 2010:
http://www.growsonyou.com/balcony/blog/18261-hippy-hippy-hippeastrums
Here is another blog where I show a couple that began to flower in September 2012:
http://www.growsonyou.com/balcony/blog/21424-amaryllis-flowering-in-september
You may find this one about them flowering non-stop for months of interest too:
http://www.growsonyou.com/balcony/blog/22950-amaryllis-flowering-non-stop.
Hope you will find this blog of help in getting your Amaryllis to flower in future years. Please DON’T throw them away after flowering – they are a good investment for the future. They are as easy to grow as Daffodils! Just follow my advice above & you’ll have as many as I have – after a few years!
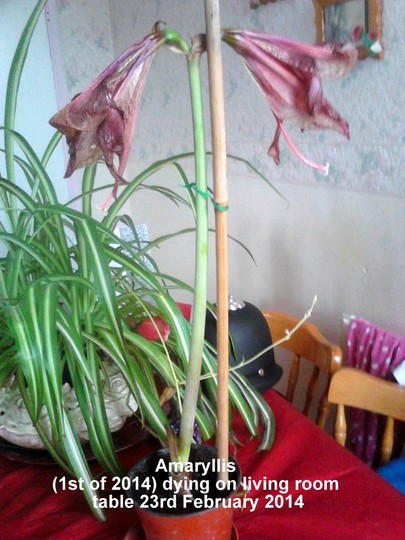
Just a few shots of them flowering during April 2014 on our living room table:


White with Red edgings Very close up!:

Well with those last photos of my Amaryllis in full flower in our living room I’ll put an end to this blog. I hope I’ve encouraged you not to throw these beautiful bulbs away after flowering.
One thing I’ve neglected to say, the bulbs you buy to flower at Christmas are forced bulbs in the same way as Hyacinths & Daffodils are forced to flower. Like Daffodils their natural season of flowering is in early to mid spring. Just like Daffodils & Hyacinths with a little preparation it is possible to get them to flower at Christmas. I, myself, have never done this (even though I know the technique) preferring them to flower when they do naturally. Having said that they can throw up the odd scape (flower stem) during the summer or at any time of the year, even if all the plants get exactly the same treatment.
While preparing this blog for posting I suddenly remembered I hadn’t mentioned support for the flowers. I have used bamboo canes for years but as I find them not to very attractive I’ve never really liked them. Then a month or so ago I discovered some thin green sticks/canes about 60cm/23 inches long. I have used them to support the scapes (flower stems) this year & they are a lot less obtrusive, as you can see in the photos above.
 30 Apr, 2014
 5 likes
Previous post: Amaryllis 'Anglo-American hybrids' seedling being repotted.
Next post: Some of my houseplants
Comments
Thanks for your vote of confidence, Holly! I hope many more people will find this blog useful as well.
1 May, 2014
I'm sure they will :))
1 May, 2014
Thankyou for all that information - I have a moderate success with the plants but not the reflowering bit - so thanks again - Jane
1 May, 2014
Thankyou Balcony much appreciated, as I say I lost one but the whites are still going strong so with your instructions and my fingers xxx I hope to still have them on show for next year....
Added to my faves for future reference..
1 May, 2014
You are welcome, Jane & Lincslass! :-)) If I can help to save some Amaryllis through my advice then I'm more than happy! And if I can get more people's Amaryllis to survive another year & reflower the following - then I'm over the Moon!
I'm sorry to here your stripy Amaryllis has died, Lincslass. :-(( But I hope my advice in this blog will help you to get them trough another year & hopefully flower again next year. I hope you will keep me updated & we can celebrate together next year their successful flowering!
Any time you feel you would like more info on any aspect of growing Amaryllis then just drop me a line as I'm always willing to help.
1 May, 2014
Thanks Balcony...
1 May, 2014
Very interesting Balcony and a little different from what I've been doing - change is on the way! Into favourites.
When you take them to the allotment what do you do with them there?
My red one that seems to have stopped flowering is at least 20 years old and flowered every year until quite recently - hence I'm waiting to see if the offshoots will make it. should I detach them and if so when? (Sorry I've asked this on the questions page as well before I saw the blog) Its standing outside at present.
1 May, 2014
Very informative. Thank you. I've got 2 bulbs which I always forget about, and then find them starting to grow new leaves. Sometimes they have a weak flowering stem.
Now I shall follow your advice and hope to get better results next year :)
2 May, 2014
Glad you found the blog of interest, Avis. :-))
Stera, I was astounded to hear you have had the same bulb for 20 years!!! I have NO idea where my originals maybe - except the pure white - that has obviously died since I took my bulbs down to the allotment for the first time 4 years ago. It had fragmented anyway, perhaps the bublets just died, I've no idea but I do miss it! The other two - one pure red & the other red with a white stripe down its petals could be amongst any of the 50 odd pots I had (I say "had" because now there must be almost twice as many!) growing. Unless I mark the pots there is no way of knowing for sure what colour the bulb is till the buds start to open.
Don't worry about asking the same question on two different blogs! But, as I said to Lincslass, & I say to anyone who reads these blogs/comments, you are welcome to contact me at any time if you want to know anything about growing Amaryllis. I'm not the "foremost authority" on growing these lovely plants but, I think you will agree, I've had quite a bit of success with them! I'll always do my best to answer your question & if it is something I can't answer I will try to find the answer for you & in the case I still can't answer you I will let you know.
Thanks, Hywel, I'm sure they will do better for you with a little care. Your garden plants always look so good, as well as your lovely Fuchsias, that I'm convinced that, with a little attention from you, they will grow & prosper & give you years of lovely flowers! :-))
2 May, 2014
Recent posts by balcony
- Planters around cash machine 2025
28 Jun, 2025
- Using Baking Soda around the garden
28 Jun, 2025
- Trouble with GoY
6 Jun, 2025
- Happy Christmas
19 Dec, 2024
- Another look at the planters ...
21 Nov, 2024
- Pansies & Violas on the balcony
28 Oct, 2024
Thanks for all the info Balcony very useful :)) yours are always lovely...
1 May, 2014