Growing Sarracenias from Seed
By Sid
13 comments
I’m afraid it was a bit of an impulse buy. But when I saw pitcher plant seeds for sale on e-bay, well, that deep rooted reptilian part of the brain where our most primordial instincts reside kicked in with a small voice, urging, urging…. With some women it’s shoes and handbags, with me it’s an unusual plant. What else was I to do? I couple of deft clicks later and I had hunter-gathered seeds of two species: Sarracenia purpurea and Sarracenia leucophylla. That was the easy part…….
The little packets duly arrived and at that point I realised there might be more to this lark than I’d bargained for. Some research was in order then!
Luckily, GoY has it’s very own Sarraceniac (John) who provided lots of help and advice and I also referred to web sites recommended by John and also referred to my book on propagation. I have tried to reference the main points, but as I’m a complete beginner please understand that all the info I give here is second hand and came in one form or another from the sources I’ve referenced at the end. Most of the info came from John – so, many thanks to him!
And so, to business. Below, I have set out exactly what I have done to sow the Sarracenia seeds. Whether it was all in vein we will not know for another few months or even years…whereas the S. purpurea seeds should germinate relatively soon, the S. leucophylla may take up to three years to germinate (1).
Step 1 – mix your compost.
Sarracenias are lime intolerant. Care must be taken to use a growing medium that does not contain any lime and rain water or purified water must be used, not tap water. The natural habitat is a fresh water marsh and the compost mix is designed to mimic their natural habitat, which is highly water retentive, low in nutrients and lime free (1)(3).
The appropriate compost mix for almost all North American Sarracenias is 50:50 peat and sharp sand with chopped spagnum moss added into the mix (1)(2)(3).
Buying peat went against my conscience a little, but it seems there is no practical substitute. I went to B&Q and then on to Wyevale Garden Centre to buy peat and was told at both places that they no longer stock peat and was generally made to feel like an environmental terrorist. I made an out-of-town visit to my favourite independant – Pengethly Garden Centre – and they had peat bales. Ironic then that I ended up having to buy such a large bag when I only needed a little bit. Ironic also that both B&Q and Wyevale were both stocking spagnum moss and peat products such as Erin pots. Ah, well…

A bale of moss peat.

The sharp sand was easy to find. Though not in small bags… Not to be confused with builders sand, sharp sand is lime free.

Spagnum moss is a protected species (1). This bag was bought from ‘holier than thou’ Wyevale for about £2.50 and was being sold for lining hanging baskets. Humph.

This is the first time I have used spagnum moss for anything. I had to ask John whether it was the same stuff that grows in my lawn! It is not of course. Spagnum moss has a very strange feel to it – it is quite tough-feeling when dry and very pale in colour, but as soon as you add water, it turns almost turquoise in colour and holds ALOT of water.

Now, mix it all together……

And add water to the point that when you squeeze it you can see water, but not to the point that you make a soup (3). There. That looks about right!
Step 2 – fill your pots.

Because the compost mix is quite light, it can easily be lost through the drainage holes. A layer of pine needles is recommended in the bottom of the pots, as they help keep the compost in and do not rot away too quickly (3). I did not have any pine needles to hand, but thought that clippings from a conifer hedge would do the same trick, as they are also slow to rot down.

Next, fill up the pots with the compost mix…..

My book on propagaton (2) recommended pushing some spagnum moss through a sieve and applying a 5mm layer of the resulting ‘bits’ to the top of the compost. Being incapable of following simple instructions, I used about 1mm instead, mostly because sieving moss is boring and my attention span is about equal to that of a knat. My book also advises sinking the pot into a larger pot filled with spagnum moss, which is meant to raise the humidity, but I felt this sounded unnecessary and a faff.
Step 3 – sow your seeds.
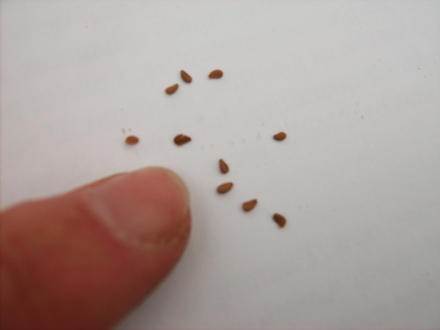
The seeds are quite tiny. I sowed them by sliding them off a sheet of paper one at a time.

The pots were then labled and submerged up to a third of their own depth in rainwater (3). The S. leucophylla requires some warmth to germinate and was placed in a propagator (for humidity) in the greenhouse.
S. purpurea on the other hand requires a period of cold, so their pot has been placed outside. There is a problem with that, though, in that falling rain could wash away my seeds or uproot any seedlings. And so a little engineering is required……..
A stick was placed in the middle of the pot, the airing cupboard was raided for a clapped-out old bed sheet and a tent was made over the pot using the material and fixed to the top of the stick and the rim of the pot using rubber bands (3).
I used the remaining compost mix to pot on my two little pitcher plants – they look better now they have bigger pots and a nice cosmetic dressing of spagnum moss around the top of the pots sets them off nicely.

Wish me well in my strange endeavours. I have new neighbours and I suspect they are already discussing the strange lady next door who can be seen of a Sunday afternoon sieving moss and cutting up bed sheets to make little tents over pots…….they aint seen nuthin yet….. ;-)
References:-
(1) Sarraceniac
(2) RHS Propagating Plants (1999), Ed. A Toogood
(3) Propagating Pitcher Plants From Seed, S. Roger Horman www.pitcherplant.org/propagation.html
UPDATE – 19 May 2009
Well, I’m VERY excited to be able to report that about two weeks ago a tiny green shoot appeared in one of my pots of the S. leucophylla. I didn’t update this blog straight away as I had been warned that the leucophylla could take years to germinate and the tiny seedling actually looked nothing like a pitcher plant, so I suspected it of being a weed. HOWEVER, it is now looking more and more like a Sarracenia and I’m now pretty sure that that is what it is! Success! Yay! I will try to get a photo if my camera will focus on such a tiny object.
26 May 2009 and here is the seedling (and there’s a second one just now appearing):-

17 June 2009 I now have 4 S. leucophylla up and 2 S. purpurea.
 17 Mar, 2009
 7 likes
More blog posts by Sid
Previous post: Dahlias - lamenting the old and welcoming the new.
Next post: Fatal Attraction
Comments
Great job Sid, and I wish you much success ! Doubt I 'd have the patence to grow the S.leucophylla, I'd forget to keep it watered, my attention spand isn't that long.
Don't give your new neighbors a thought...lol, just offer the lady of the house a few of your lovely pass-along plants and she will think you're heaven sent ! Besides, once she gets a look at your garden, I have the snicky feeling you may have her making sheet tents of her own before the season is through...;-).
18 Mar, 2009

Fantastic Sid.....I did the same thing and succumed to the call of the unusual and bought Sarracenia purpurea and S. psittacina. I'm so glad you wrote this blog as I haven't planted mine yet. I will follow your lead and hopefully we will both end up with some wonderful carnivores.
18 Mar, 2009
I'd love to grow these plants and maybe I'll try some seeds like you've done Sid. I shall follow your blog if you don't mind.
18 Mar, 2009
Very interesting blog but I think I will stick to more convential plants - I get impatient waiting for my lettuce seeds to start growing :) Hope you will keep us informed of progress.
18 Mar, 2009
Bb - I had a bit of a rant there didn't I?! he he...
F1 - I met my new neighbour for the fist time today - very briefly! She came by to collect a parcel I'd taken delivery of for her. She seemed a bit nervous - or was it suspicious?!
Gilli - it seems that the plants are quite easy to care for - just so long as they are kept wet all the time and do not get any lime near them. Have you posted pictures of yours yet? I'll go look.......
Hywel - of course I don't mind....but you might like to wait until I've had some success before you try doing it the same way! lol
Gee - yep - you'll defo hear about it the moment a seedling emerges! Fingers crossed.........
19 Mar, 2009
That was really interesting.
I hope they come on for you.
22 Apr, 2009
Nothing yet Llew, but keeping a close eye on them! :-)
23 Apr, 2009
Just a quick note to let you all know that I've added an update to the foot of this blog :-)
19 May, 2009
Oh, excellent news, Sid. Well done, you.
I hope they all come on for you. :o)
19 May, 2009
Now updated with photo :-)
26 May, 2009
Yay!!!! you. :o)
26 May, 2009
Thanks x-)
27 May, 2009
Recent posts by Sid
- Seedlings, Seedlings, Seedlings!!
2 May, 2010
- Garden Waste (Les Barker)
19 Mar, 2010
- It's a funny old life...
4 Mar, 2010
- Seeds, seeds, seeds!!!
2 Feb, 2010
- A Snowy Wandering....
7 Jan, 2010
- Bodnant Gardens - North Wales - September 2009
4 Nov, 2009
Members who like this blog
-
Gardening with friends since
4 Feb, 2008 -
Gardening with friends since
2 Jul, 2008 -
Gardening with friends since
22 Oct, 2008 -
Gardening with friends since
4 Mar, 2008 -
Gardening with friends since
18 Sep, 2008 -
Gardening with friends since
10 Nov, 2008 -
Gardening with friends since
13 Apr, 2009
Really interesting blog Sid and never knew there was so much involved in propogating them.
Your points re - peat products are thought provoking and never considered those pots to be made from peat I assumed they were paper or cardboard !
17 Mar, 2009