Building a Living Wall
By derekp
18 comments
Hi Everyone.
I thought I’d share some photo’s with you on how my wife and I went about building our Living Wall.
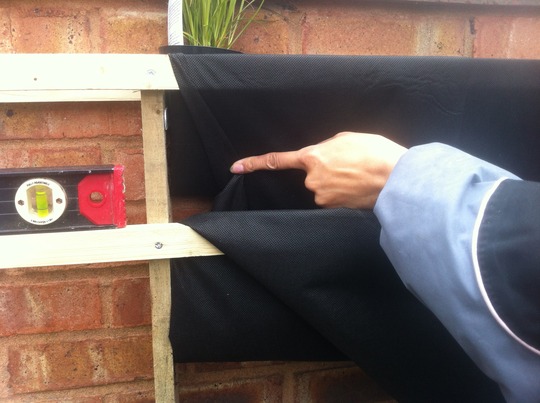
We have a brick wall which we decided we would like to cover with plants. The Living Wall measures 6ft x 5ft 6inches and cost about £25 in total for all the materials excluding the plants.
All we need to do now is fill the pockets with plants, which my wife will be working hard over the week to do. Once the project is compete, and all the plants are in then I will upload the pictures for you to see.
Hope you enjoy them.
Derek & Jackie


 24 Jun, 2012
 19 likes
More blog posts by derekp
Previous post: 2011 Milton Keynes Garden of the Year competion
Next post: Milton Keynes Garden of the Year 2013 Competition
Comments
Brilliant...... this is going to look fab in a few weeks!!! well done, what did you use to make the "pockets" ...look forward to seeing how this progresses, been so much talk on living walls recently...your version LOOKS FAB..... and great price you have managed to achieve it for x
PS = Loving your statue x
24 Jun, 2012
I too, would be interested in updates from you Derek.
24 Jun, 2012
WOW I love it, great choice of plants too derekp, looking forward to seeing it in a few weeks..
24 Jun, 2012
What a great idear, bet it will look lovely when plants have grown a bit more
24 Jun, 2012
How do the plants drain, Derek?
I think this is a great idea and more practical than others I've looked at. It's going to look fabulous.
24 Jun, 2012
That looks really great. I love living walls, although the one they showed at GW live event did seem costly as they advised buying purpose made materials. The black material you've used looks good even before the plants have had chance to cover it too.
24 Jun, 2012
Saw one of these at tthe oldest pub in B'ham( England?) ~ forget the name but in Digbeth. It was so impressive. Yours looks to have made a very good start. Good luck with it.
24 Jun, 2012
Looking forward to seeing your updates as well!
25 Jun, 2012
Very cleaver! Looks great! Is it black, plastic? Or garden weed fabric?
25 Jun, 2012
That is so ingenious, Derek! And looking good, too - lovely choice of plants. Brilliant idea.
Now I'm going to spoil it all by asking you what happens at the end of each gully, which presumably is full of compost - what's to stop it washing out each time you water? Have you stapled it vertically or is it open?
25 Jun, 2012
Hi Jackie and Derek...
This is a fascinating project.
I'm adding the blog to GoYpedia "Walls".
Are the bricks likely to be damaged by damp or condensation, or does the wall itself stay dry ?
Updates with more photos will be very interesting. :o)
25 Jun, 2012
Thats really good, i love all the greens together against the black it looks stunning.
25 Jun, 2012
yes keep us updated, be great to see how it develops
26 Jun, 2012
I want to say a big thank you for all your kind and positive comments. Sorry it's been a while to update this blog. I have included a couple of extra photos of how our living wall is looking 6 weeks on.
The wall is starting to fill out nicely considering this side of the wall does not get any sun from late morning onwards. The plants are well protected from the wind and rain so it's been important to water these every other day. Even with the hard rain we've been having it's still been pretty dry.
Just to answer a few of the questions.
The fabric I chose is just normal weed suppressant fabric. This is a strong, durable and allows good drainage for the water. I use a spray gun to water and aim just above the tops of the plants, this allows the water to miss the soil and it then runs down the back of the fabic getting into the soil. So long as I don't use a powerful spray it doesn't wash the soil away.
The fabric is open at the sides. Once the compost is in, it doesn't fall out the sides as the fabric is butted right up to the edge of the wood and the compost compacts down. Please let me know if you have any questions. Thanks again. Derek and Jackie
5 Aug, 2012
That looks really good - well done Derek and Jackie!
5 Aug, 2012
Oh, that IS looking good. An altogether successful venture, I'd say, and thank you for being thoughtful enough to update us.
5 Aug, 2012
A thank you for the update from me too....it does look good. All the different colour and textures. Well done!
7 Aug, 2012
Featured on
Recent posts by derekp
- Milton Keynes Garden of the Year 2014 Competition
18 Jul, 2014
- Milton Keynes Garden of the Year 2013 Competition
9 Aug, 2013
- 2011 Milton Keynes Garden of the Year competion
14 Jul, 2011
Members who like this blog
-
Gardening with friends since
9 May, 2011 -
Gardening with friends since
28 May, 2012 -
Gardening with friends since
6 Jun, 2010 -
Gardening with friends since
17 Jul, 2010 -
Gardening with friends since
5 Aug, 2008 -
Gardening with friends since
16 Jul, 2011 -
Gardening with friends since
25 Aug, 2011 -
Gardening with friends since
31 May, 2011 -
Gardening with friends since
2 Nov, 2009 -
Gardening with friends since
29 Apr, 2010 -
Gardening with friends since
18 Sep, 2011 -
Gardening with friends since
14 Aug, 2008 -
Gardening with friends since
10 Sep, 2010 -
Gardening with friends since
27 Oct, 2009 -
Gardening with friends since
21 Jan, 2012 -
Gardening with friends since
16 Mar, 2009 -
Gardening with friends since
26 Sep, 2010 -
Gardening with friends since
8 Apr, 2010 -
Gardening with friends since
22 Oct, 2008
That does look very clever of you Derek. Far much cheaper that has been shown on TV.
How do you intend watering? They recommened one of those watering systems - which again would bump up the price.
I do hope you do us updates...there were quite a few members who expressed an interest in this.
Thank you.
24 Jun, 2012