Cambridge Botanical Gardens (Compost Corner) 2
By balcony
12 comments
Cambridge Botanical Gardens (Compost Corner) 2
This is a continuation of the previous blog on composting.
What a lot of hot rot!
Hot composting
This is a good option if you have a large garden or lots of material, as you build the pile in one go. It’s faster than the cool method – you should have compost within 6 months.
The heat generated kills many of the weeds & seed in the pile. Like cool composting you need a balance of green & brown biodegradable material, as well as moisture & air.

How do I start?
1. Make or buy a bin. A double bin is needed as you can turn the pile from one to another. Collect together material, avoiding things like branches – they take too long to decay. Ideally shred or chop your waste into small pieces. Fill 1 bin with an even mix of greens & browns. Within a few days, bacteria start decomposing the material, breaking it down. This activity can make the heap too hot to touch. If it feels dry at any stage, add water.
2. When it has cooled down, turn the heap into the next bin. This adds air which speeds up bacterial activity making the pile heat up again. It also moves in uncomposted material from the outer edges.
3. After the temperature has peaked & dropped again, turn the material back into the first bin. The process will restart. Do this every couple of weeks until the material fails to heat up. If you leave it now insects & worms will move in & break down the compost even more.
Clever converters
Plastic converters are another alternative for home composting. They are tidy, save space & speed up decay by keeping the contents warm.
1 or 2 converters would be enough for an average household.

What can I compost?
The ingredients are the same as for cool & hot piles. Your main sources are kitchen & garden waste. Aim for an even mix of Greens (such as un-cooked vegetables & fruit waste, grass, weeds) & Browns (like card, paper, straw, twigs dead leaves).
Starting from scratch
1. Choose a warm place to put your converter, preferably on soil. If you break up the surface before you putting the converter in place, it will help with drainage & allow worms, insects & fungi to move in & out of the heap.
2. Add your materials in loose layers of greens & browns.
3. You can turn your pile occasionally to mix materials & add air. This will speed up the process.
4. Keep the compost damp by adding grass cuttings, vegetable waste or small quantities of water.
How long does it take?
Up to 6 months, depending on the materials you put in & the temperature of in the container.
The converter contains material at all stages of decomposition. The compost usually collects in the bottom layer. It is ready to use when you can no longer tell what the original material was.
No thanks!
Remember to avoid meat, fish, dairy products. cooked foods & things that don’t decompose.
Leaf litter
Fungi rot down dead leaves & turn them into a rich compost called leaf mould.
Beech leaves are the best for making leaf mould. Some leaves (like Plane & Chestnut) are slow to decompose. You could shred them to make to make the process quicker or just leave them out.
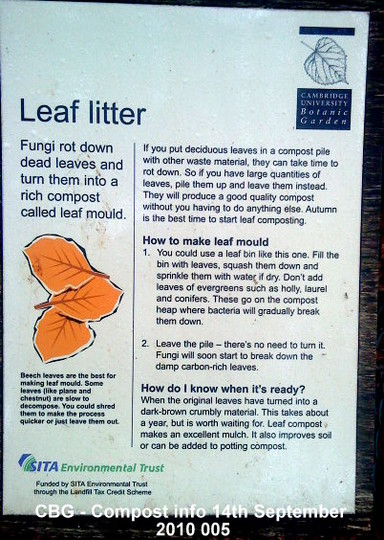
If you put deciduous leaves in a compost pile with other waste material, they can take time to rot down. So if you have large quantities of leaves, pile them up & leave them instead. They will produce a good quality compost without you having to do anything else. Autumn is the best time to start leaf composting.
How to make leaf mould
1. You could use a leaf bin. Fill the bin with leaves, squash then down & sprinkle them with water if dry. Don’t add leaves of evergreens such as Holly, Laurel & Conifers. These go on the compost heap where bacteria will gradually break them down.
2. Leave the pile – there’s no need to turn it. Fungi will soon start to break down the damp carbon-rich leaves.
How do I know when it is ready?
When the original leaves have turned into a dark-brown crumbly material. This takes about a year, but it is worth waiting for. Leaf compost makes an excellent mulch. It also improves soil or can be added to potting compost.
That’s part two which I hope you will find as interesting as Part 1.
In a day or two I shall do the final part of the blogs on composting.
 17 Nov, 2010
 9 likes
Previous post: Cambridge Botanical Gardens (Compost Corner) 1
Next post: Cambridge Botanical Gardens (Compost Corner) 3
Comments
Thanks, Littlelegs. Glad to be of help! :-)) The next one will be up shortly.
18 Nov, 2010
Again...a great piece of instructions to add to favourites for future reference. Thank you, Balcony.
18 Nov, 2010
great blog again Balcony,really useful information..:o)
18 Nov, 2010
Thanks for this instalment Balcony. Looking forward to part 3. :-)
18 Nov, 2010
I found this very interesting. I used to make lovely leafmould when I lived in the old cottage. It did take a year or longer, but was wonderful stuff when ready.
18 Nov, 2010
Only too glad to be of service! I'm so glad you find this information as useful as I did! :-))
Gerry brought some sacks of leaves down to the allotment about 10 days ago & we erected a couple of old corrugated metal sheets. We then emptied all the bags of leaves in there. They will stay there now till next year when I hope we will have a load of lovely, crumbly leafmould! :-))
19 Nov, 2010

thats grand stuff...leafmould rocks!!!!
12 Sep, 2013
Yes, leaf mould is very good material to use in the garden! Our leaves rotted down but they didn't do it nearly as well as I would have liked! If memory serves me right we had a VERY wet winter that year & perhaps the leaves were just too wet for the process to complete properly. We haven't had that amount of leaves since then. :-((
19 Sep, 2013
yes thats sad...
19 Sep, 2013
Maybe Gerry will find some sacks of leaves this year. If he does I'll leave the leaves in the bags this time & just give them a good soaking & then put them behind the shed probably.
23 Sep, 2013
good thinking...all done then dusted then....
23 Sep, 2013
Featured on
Recent posts by balcony
- Planters around cash machine 2025
28 Jun, 2025
- Using Baking Soda around the garden
28 Jun, 2025
- Trouble with GoY
6 Jun, 2025
- Happy Christmas
19 Dec, 2024
- Another look at the planters ...
21 Nov, 2024
- Pansies & Violas on the balcony
28 Oct, 2024
Members who like this blog
-
Gardening with friends since
9 Aug, 2009 -
Gardening with friends since
8 Apr, 2010 -
Gardening with friends since
4 Jul, 2008 -
Gardening with friends since
8 Aug, 2010 -
Gardening with friends since
22 Aug, 2010 -
Gardening with friends since
24 Jun, 2007 -
Gardening with friends since
14 Aug, 2008 -
Gardening with friends since
14 May, 2010 -
Gardening with friends since
29 Mar, 2008
Keep them coming Balcony, really useful info, have saved both to favorites.
18 Nov, 2010